Sunday, 18 December 2022

Migrate file share witness in cluster


  • Create the required folders on new file share server and grant the permissions
  • On the primary node Right click on the PowerShell in the programs folder and right click to select run as administrator. And run the below commands
    Import-Module FailoverClusters
  • Set-ClusterQuorum -NodeMajority
  • Verify the cluster shares were removed then set the share back to the new location.
  • Run the below command to set the new file share witness to the cluster.
  • Set-ClusterQuorum-NodeAndFileShareMajority\\fileserver\fsw
    Ex : Set-ClusterQuorum - NodeAndFileShareMajority\\oduhu\sq|2012clsprdfsws

PowerShell script to restore all databases at a time

 $backupRoot = Get-ChildItem -Path "F:\F_SQLBackup1\SQLBackup\CTASK0046007" 

$datafilesDest = "F:\F_SQLData1\SQLData" 

$logfilesDest = "F:\F_SQLLog1\SQLLog" 

$FilestreamDest = "F:\F_SQLData1\SQLData" 

$server = "USPILVMUMCSSQ01\INST1" 


# Create some “Relocate” file objects to pass to the Restore-SqlDatabase cmdlet…


## For each folder in the backup root directory...

#

foreach($folder in $backupRoot)

{   

    # Get the most recent .bak files for all databases...

    $backupFiles = Get-ChildItem -Path $folder.FullName -Filter "*.bak" -Recurse | Sort-Object -Property CreationTime -Descending | Select-Object -First 1


    # For each .bak file...

    foreach ($backupFile in $backupFiles)

    {

        # Restore the header to get the database name...

        $query = "RESTORE HEADERONLY FROM DISK = N'"+$backupFile.FullName+"'"

        $headerInfo = Invoke-Sqlcmd -ServerInstance $server -Query $query

        $databaseName = $headerInfo.DatabaseName


        # Restore the file list to get the logical filenames of the database files...

        $query = "RESTORE FILELISTONLY FROM DISK = N'"+$backupFile.FullName+"'"

        $files = Invoke-Sqlcmd -ServerInstance $server -Query $query


        # Differentiate data files from log files...

        $dataFile = $files | Where-Object -Property Type -EQ "D"

        $logFile = $files | Where-Object -Property Type -EQ "L"

$Filestream = $files | Where-Object -Property Type -EQ "S"


        # Set some variables...

        $dataFileName = $dataFile.LogicalName

        $logFileName = $logFile.LogicalName

$FilestreamName = $Filestream.LogicalName


        # Set the destination of the restored files…

$relocate=@()


foreach ($dataFileName_one in $datafilename){

$dataFileFullPath = $datafilesDest+”\”+$dataFileName_one+”.mdf”

$obj= New-Object Microsoft.SqlServer.Management.Smo.RelocateFile($dataFileName_one,$dataFileFullPath)

$Relocate+=$obj

}

foreach ($logFileName_one in $logFileName){

$logFileFullPath = $logfilesDest+”\”+$logFileName_one+”.ldf”

$obj= New-Object Microsoft.SqlServer.Management.Smo.RelocateFile($logFileName_one,$logFileFullPath)

$Relocate+=$obj

}

foreach ($Filestream_one in $FilestreamName){

$FilestreamPath = $FilestreamDest+”\”+$Filestream_one

$obj= New-Object Microsoft.SqlServer.Management.Smo.RelocateFile($Filestream_one,$FilestreamPath)

$Relocate+=$obj

}


        # Create some "Relocate" file objects to pass to the Restore-SqlDatabase cmdlet...

        $RelocateData = New-Object 'Microsoft.SqlServer.Management.Smo.RelocateFile, Microsoft.SqlServer.SmoExtended, Version=12.0.0.0, Culture=neutral, PublicKeyToken=89845dcd8080cc91' -ArgumentList $dataFileName, $dataFileFullPath

        $RelocateLog = New-Object 'Microsoft.SqlServer.Management.Smo.RelocateFile, Microsoft.SqlServer.SmoExtended, Version=12.0.0.0, Culture=neutral, PublicKeyToken=89845dcd8080cc91' -ArgumentList $logFileName, $logFileFullPath


        # Perform the database restore... and then go around the loop.

        Restore-SqlDatabase -ServerInstance $server -Database $databaseName -BackupFile $backupFile.FullName -RelocateFile $relocate -ReplaceDatabase 


    }

Sunday, 15 May 2022

Migration Plan for SQL Servers


Hi All,


I’m planning to migrate all our SQL Servers to the latest version i.e., SQL Server 2019.


Below are the different  approaches I’m planning to follow for migrating AG and Cluster servers:

For AG servers, The OS version is Windows server 2012. Hence, In-Place upgrade to SQL Server 2019 is not possible. So for AG servers preferred migration approach is ‘Side by Side’.

For Cluster Server, The OS version is Windows Server 2016. Hence, In-Place upgrade to SQL Server 2019 is possible. So for Cluster servers preferred migration approach is ‘In-Place upgrade’


Server Name

OS Version

SQL Server Version

Cluster/AG

Preferred Migration Method

Target SQL Server Version

NSC-SP-SQLCLS1

Windows Server 2016

SQL Server 2014

Cluster

In-Place Upgrad

SQL Server 2019

NSC-SP-SQLCLS2

Windows Server 2016

SQL Server 2014

Cluster

In-Place Upgrad

SQL Server 2019

SSC-SP-SQLCLS1

Windows Server 2016

SQL Server 2014

Cluster

In-Place Upgrad

SQL Server 2019

SSC-SP-SQLCLS1

Windows Server 2016

SQL Server 2014

Cluster

In-Place Upgrad

SQL Server 2019

SP13-PRD-SQLSVC

Windows Server 2012

SQL Server 2014

Always ON

Side by Side

SQL Server 2019

SP13-LAB-SQLSVC

Windows Server 2012

SQL Server 2014

Always ON

Side by Side

SQL Server 2019


Below are the plans for Side by Side and In-Place migration:

Plan for Side By Side upgrade for AG servers:

  • 1.       Build the new servers with Window server 2016 OS and similar configurations as old server(Drives, Memory,  CPU)
  • 2.       Install the SQL Server failover cluster manager on both the nodes
  • 3.       Add the nodes to cluster
  • 4.       Install the SQL Server 2019 on each node
  • 5.       Enable Always On availability groups feature in configuration manager on each node
  • 6.       Configure Always on availability groups
  • 7.       Configure Listener
  • 8.       Migrate the databases, logins, jobs, linked servers and other objects if any from old server to new server
  • 9.       Change the server name to new name in application connection string – Application Team


Plan of In-Place upgrade for Cluster servers:

  • 1.       Take the backup of all database
  • 2.       Take a snapshot of VM if possible
  • 3.       Copy the SQL Server 2019 enterprise edition software on each node
  • 4.       Perform the SQL Server in-place upgrade on secondary node
  • 5.       Once upgrade successful on secondary node, perform the failover .
  • 6.       Now do the In-place upgrade on current secondary node
  • 7.       After the upgrade, check the application functionality.


If the above plan is okay then soon I’ll share the schedule for each server.


Please let me know if you have any questions or concerns.


Monday, 28 March 2022


I have verified all our SQL Servers and created attached document to track the migration activity.


Please find the below high level migration plan.


1. Checking the SQL Server Version and edition 

2. Checking the OS version 

2. Pickup the servers that are going to EOL soon


Migration plan : Prefered target version of SQL Server is SQL Server 2017

1. check the application compatability for sql server 2017

2. if application is compatable start the new server build with the same configurations as source for always on servers

3. We have cluster server with OS Window Server 2016, Hence we can do the In-Place upgrade for SQL Server to 2019 for cluster servers.


Plan for Always ON servers :

1. Build the new VMs with same configurations as source

2. Add the VMs into cluster and configure the cluster

3. Configure the Always ON

4. Migrate all the databases and related objects(jobs, logins, linked servers, ssis packages) during the cutover time.


Plan for Failover cluster servers:

1.Current OS version for all failover clusters is Windows server 2016

2.Perform the In-Place upgrade from SQL Server 2014 to SQL Server 2017


Detailed migration plan along with teh migration checklist will be shared after we agree on the above plan.


I'm planning to pick the 'xxxx' server first as it is going to EOL soon.

Tuesday, 8 March 2022

ADD and Remove the DB from AG


Removing the DB from AG group:


1.       Connect to the server 'Server Name' using SSMS

2.       Click On Availability Groups and expand the Availability groups and expand Availability databases


3.       Now right click on the selected database and click on remove database from availability Group


4.       Now notice the database has been removed from the availability group


Re adding the DB to AG group :


1.       Connect to the secondary node 'Server Name '

2.       Notice the database that we removed from AG is in restoring state

3.       Drop the database from the secondary node

Drop database 'DBname'

4.       Connect to the Primary Node again

5.       Go to Availability Groups and expand AG Group and expand availability databases

6.       Now right click on availability databases and click on


7.       Now select your database to add to AG in the window and click next


8.       Now click on connect to connect secondary replica and click next


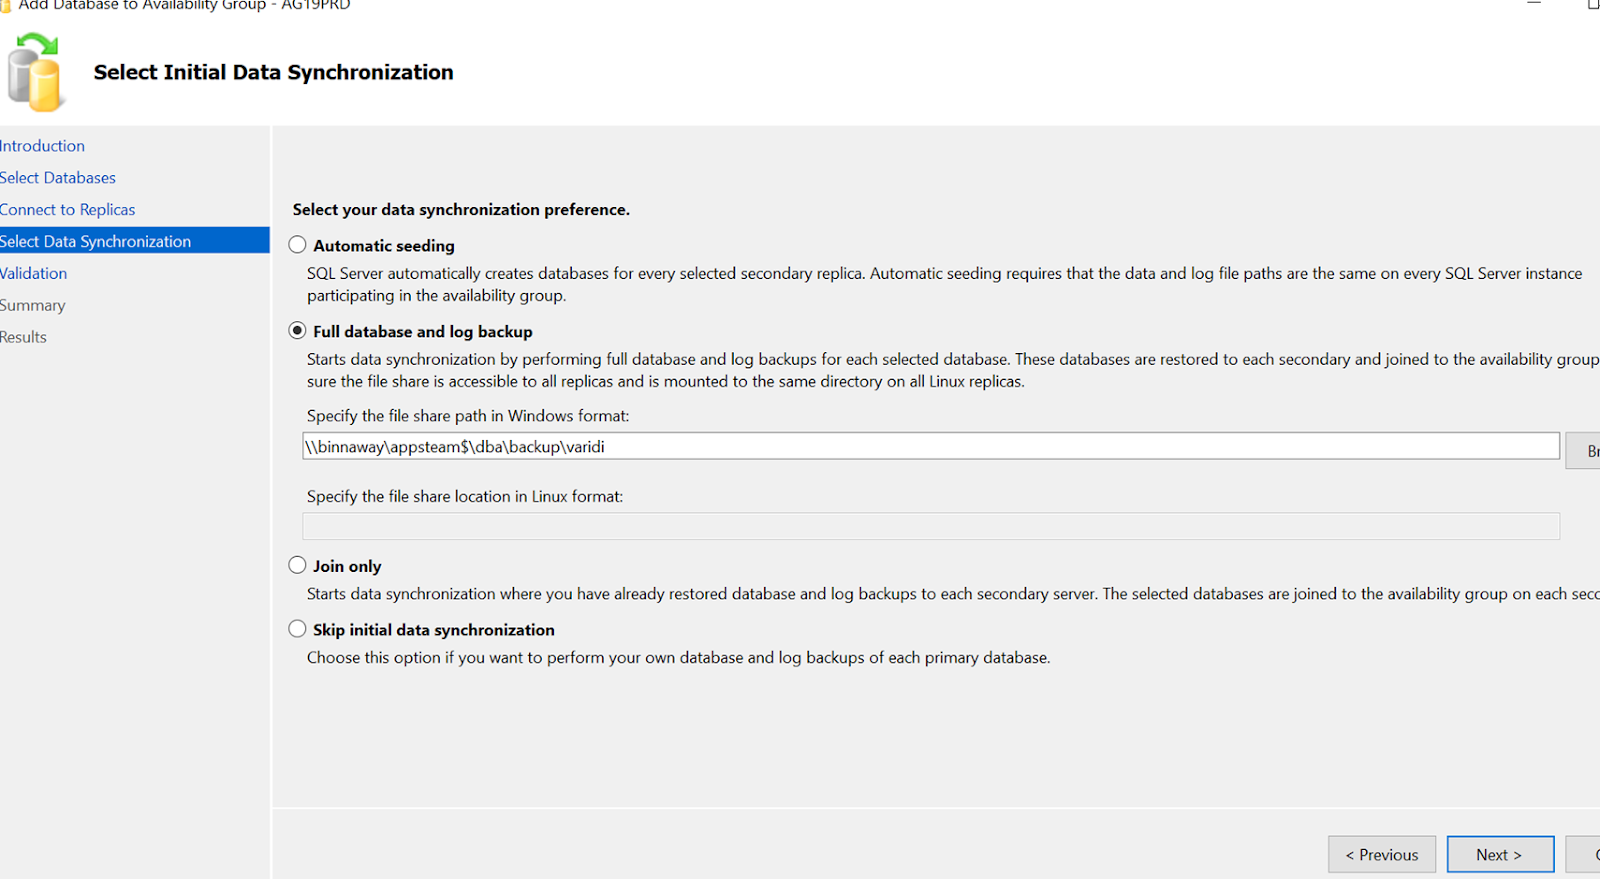
9.       Now select the second option and give the shared path as shown in below image and click next


10.   Now click on Next--> Next---> Finish

11.   Notice the database is added to the AG group and it is in synchronised state